How to BeipMU: The best MU Client for Windows
-
Hello MUers! @Tat showed me BeipMU. Now I'm officially off PotatoMU and onto BeipMu and you should too.
Why BeipMU?
- Spawn windows that are (mostly) better than Potato.
- Multiple input windows (YES FINALLY)
- Active support/community/development.
- Unicode, emoji, full color support.
- Ability to do, like, all the things.
Get BeipMU
First off, BeipMU looks like it's from 1998. Because it is. But it's being actively developed! So let's just move past that.
Anyways, you can go to the website here: https://beipdev.github.io/BeipMU/ And you can install it through the Windows Store here: https://www.microsoft.com/store/apps/9NBLGGH4TRSV
Or get the latest release directly here: https://github.com/BeipDev/BeipMU/releases/download/v279/BeipMU_279.zip
For reference, that link above will become outdated if there's a new release, so if you're reading this months after it's posted, go here, look for latest release: https://github.com/BeipDev/BeipMU/releases
Start Using BeipMU
If you downloaded the .zip file, you only need to unzip it in the directory you want it to to live. There's an "assets" directory, which can just stay there, but is not necessary (it contains some sample config information, some sample worlds, etc). The program will write a config file in
/%APPDATA%/BeipMUfolder, if that's the kinda thing you think about.Run BeipMU.exe!
There's a very nice starting starting guide, so please check that out. But here's the QUICK GUIDE for lazy MUers:
- Click
Connectionon the top bar. ClickConnect.... - Click
New...at bottom. ClickServer. This part should hopefully be straight forward! You probably want to setText Encodingto UTF8. - Click
New...again and this time chooseCharacter. This is where we need to add some things.Connect String: This is everything you want the client to send once it receives a response from the server. At the most basic, this is going to beconnect <name> <password>. This is also where you'll set up a lot of extras, but we'll get to that LATER! Note: Each line is a separate command, so you don't need;or anything between them.Connect at startup: Check!Log File...: Click this, browse to where you want your log file saved, and then enter the name of the log file, such asarx_mycharactername.txt. You'll then chooseAppend current date to log file nameso you have a daily log.
And now click
Connectat bottom. There ya go, you're connected!But skew, you promised spawns and two inputs windows! ... Yeah, that's coming in the next post.
-
ok but HOW DO YOU MAKE SPAWNS HAPPEN skew help
-
If this client allows me to make completely separate windows for spawns that I can move around on my screen like Duck Client allows me to do, I'll be sold.
-
Look + Feel
So, I won't spend much time here. You want to update the font of the input, the output, whatever? Just right click on the window you want to change and click
Settings.... It's pretty straight forward.Spawn Windows
Here's Beip's guide to spawn windows.
And now here's how I do it. This is what my screen looks like:
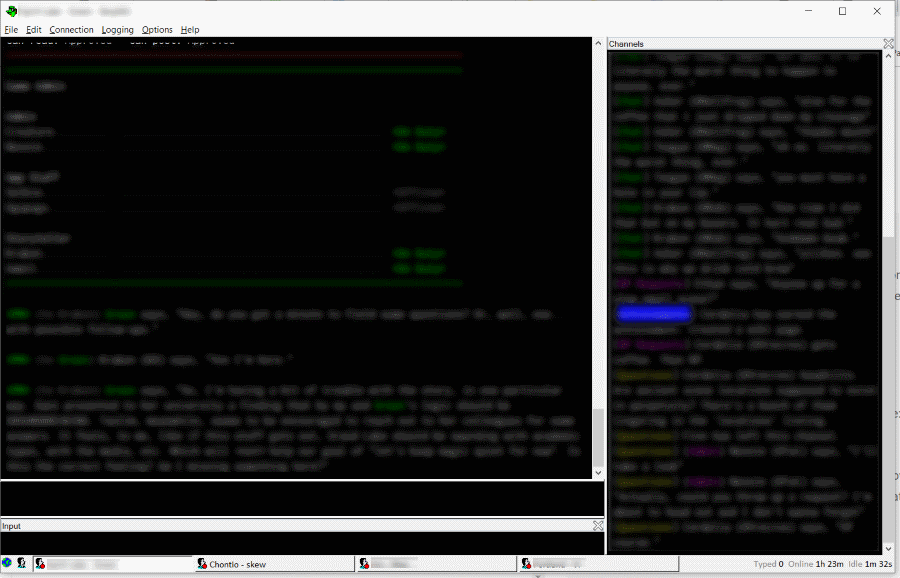
On the right, I have all my chat channels spawned. This way everything is still on screen (I don't like tabs/windows/etc) but it's not in my actual scene/rp feed. Now, you can do multiple windows (via puppet windows). But that'll come in a later post (because I frankly don't know how to set it up).
To do the above...
- Create A Trigger: Go to
Optionson the top, thenTriggers... - You can create a trigger globally, by server, or by character. Choose which one you want to use, then click
Newin the bottom left. - On most the games I play, channels are like
[Chat]. So, I am going to choose to capture every line that starts with[<Anything Here>] ...and shunt them into the same window. If your game uses different ways to flag channels, or if they use the same marker for channels as they do other things, you should yell at them. Then you set up multiple triggers for your channels. - To capture all channels, set Matcharoo to:
^\[([^]]+)\]and then check Regular Expression. - On the Spawn tab, check Active and then input a Window Title. For me, I just did "Channels". If you have multiple triggers (say, you need to individually capture [Chat] and [Help] and whatever else) you can have them go to the same window, or multiple windows. Windows are actually the panes I show in the screenshot.
- That will get your spawn made! Except, the spawn doesn't spawn until it actually receives something, so there's one more step to do!
- Go back into your connection settings, as mentioned above. In the
Connect Stringfor the character, input a new line that looks like this:/receive [Channel] stuff. The/receivecommand will output whatever you send after it onto the screen, pretending it's been received from the MU. So, that's it! Spawns!
Two Input Windows
BeipMU is largely command driven, and the "two input windows" functionality is command driven. Which is to say, you need to send a command to create a second input window. Simple!
- In your
Connect String, mentioned in the previous post, you need to input this:/newinput - If you're using spawn windows, you might want to do
/delay 2s /newinputinstead. This will ensure the new input opens AFTER the spawn, so that it tucks nicely next to the spawn window.
Other Triggers
This is pretty straight forward...
- Create A Trigger: Go to
Optionson the top, thenTriggers... - You can create a trigger globally, by server, or by character. Choose which one you want to use, then click
Newin the bottom left.
Name Highlight:
- Matcharoo: Your character name
- Options: Check "Whole Word"
- On the Appearance tab, check "Change Foreground", then click Foreground... and choose the color you want.
Quote Highlight:
- Matcharoo:
"(.+?)" - Options: Regular Expression
- Appearance tab: Change Foreground, then click Foreground...
Pose Order Alert
This is for Ares, adjust accordingly...- Matcharoo:
%% It's your turn to pose. - Options: Whole Word
- Sound tab: Check "Play Sound" then choose the sound. On Windows 10, I used:
C:\Windows\media\tada.wavcause it's great.
Page Highlights
- Matcharoo:
^(From afar|Long distance to|\S.{1,20} pages|You paged .+? with).*$ - Options: Regular Expression
- Appearance tab: Change Foreground, then click Foreground...
Want more?!!?!?
Join the Discord server. There's some really great folks here. https://discord.gg/3A5quTU
Seriously, join. I promised Bennet a buncha people bothering him!
- Create A Trigger: Go to
-
More about Input Windows...
So, I begged and bribed to get a second Input window. But Bennet had to go and outperform, and so he's made it so you can have UNLIMITED input windows.
Use the
/newinputto spawn more windows. Use/newinput 'text'to add a prefix to your input window. And by prefix I mean you can do/newinput 'chat 'and it will make a new input window wherein everything you enter into that window is automatically prefixed withchat. Please note that's chat SPACE. This will take whatever you input literally!Which means... If you spawn
[Chat]into a window, you can drag your new input window beneath it, and have a dedicated window for that chat! For for your page conversation? Or for whatever else!Play around with it!
-
Another option for 'spawns' if you don't want to get too complicated and really like SimpleMU's separate window/tab:
You can set up a 'puppet' window for a character connection. Anything starting with a certain prefix will go there. You can set up this window to auto-add a prefix. So you could send it anything starting with <Public> and then have it start everything you type with 'pub'.
I spawn my channels this way by having anything that starts with [ go over, and input the prefix myself. I personally like this separate window behavior better.
-
Misc...
I hate the tiny input window size!
Me, too. So...- Rt Click on your input window, choose Settings.
- Look for "Height in lines..." You can set the minimum (I have 3) and the maximum. You can also stop it from resizing.
Tabbing between input windows
If you have multiple input windows, you'll find hittingtabjust inserts a tab. So...- Options up on the top. Keyboard Shortcuts...
- Look for
Input Window - Activate next input pane. Set your keyboard shortcut for that! (Setting it to tab works just fine.) - Note that I think the 'next input pane' cycles based on the order in which they were created.
Turn off the history/echo window
- Up top, Options -> Show history window
I also hate the way the output window puts text RIGHT UP AGAINST my input window...
- Right click the output window, Settings -> Margins. Add some margins!
It doesn't pause when I'm scrolled up!
No, it doesn't... BUT...- You can turn off scrolling all together by right clicking on the output window, Settings*, scroll to bottom on new text.
- Beneath that setting, there's "Split on page up"... check that, then hit page up. It's super neat.
- You can go to Options up top, then Keyboard Shortcuts... and set a pause button for "Output Window - Pause". This pauses the screen.
Can I make it scroll smoothly?
- The specific behavior seems to be some trackpad scrolling causing it to jump, like, 20-30 lines at once. I don't have an answer to this ATM, but I'll ask the dev.
Show time and date of messages?
- Rt click on the output window, Settings..., in the bottom left there's "Show Date and Time Tooltip". That will make it so when you mouse over text it shows you when it was received and how long ago that was.
-
If anyone used the instructions above for Spawn Windows... MuSoapBox ate my whacks even though it said it wouldn't. Your Matcharoo should be set to:
^\[([^]]+)\]I've updated the above, but make sure it's that.
-
I have used BeipMU for very many years and would definitely recommend it, especially for SimpleMU users looking for an upgrade that is not too dissimilar.
-
I haven't used BeipMU since... well, probably 1998. But that's looking pretty good these days, even speaking as a SimpleMU diehard. Maybe I'll get around to playing with it at some point...
-
I personally think it's the best client for MOOs on windows by far. Tried everything else and it does it all much easier.
-
So, I'm playing with it a little, and as a SimpleMUer..
-
Whoa, tabs are on the bottom? ...okay, I can probably get used to that.
-
How can I send something to history without sending it to the game? I'm constantly hitting escape to pop something there, sending something else, and hitting ctrl-p to get back to what I was doing. Changing the keys for prev/next in history is easy enough, but is there any way to just store something?
-
Is there any way to turn off automatically copying when I highlight? I often highlight while I read because it helps me to focus on just what I'm trying to read right now. It's really annoying to have it copy and un-highlight on me.
That's from my first pokes at it; I'll poke it some more later, but I wanted confirmation that I'm not just missing how to do 2 and 3 there. On the better side, I do think that ability to pull things like channels out into a side-window is neat, and the page-up split thing looks like it might be also.
-
-
@Ninjakitten said in How to BeipMU: The best MU Client for Windows:
Whoa, tabs are on the bottom? ...okay, I can probably get used to that.
This was actually my #1 problem, lol. I'm a stubborn bastard and I need my tabs at the top, damn it.
-
@Ninjakitten said in How to BeipMU: The best MU Client for Windows:
So, I'm playing with it a little, and as a SimpleMUer..
-
How can I send something to history without sending it to the game? I'm constantly hitting escape to pop something there, sending something else, and hitting ctrl-p to get back to what I was doing. Changing the keys for prev/next in history is easy enough, but is there any way to just store something?
-
Is there any way to turn off automatically copying when I highlight? I often highlight while I read because it helps me to focus on just what I'm trying to read right now. It's really annoying to have it copy and un-highlight on me.
-
Ctrl-down arrow, though I think you can set that to whatever you want in the keyboard shortcuts. I did a lot of ctrl-b'ing in SimpleMU so I should. Change that.
-
I don't think so. It's funny though because I started the same way but have now found myself getting annoyed that highlighting something in my browser doesn't also copy it. Might be worth a mention on the discord, he's pretty open to suggestion.
-
-
Yeah, I don't Discord enough to bother joining a server. So, if anyone does and wants to send feedback? Being able to move the tabs to the top would be awesome.
So far, I'm really liking everything else - especially OMG in-line spellcheck, how I missed you!
Thanks for the guide, @skew.
")
-
@Tat Thank you! I would not have thought of using what I think of as 'next' to do the storing. Hmm... not sure what's going to happen when I'm trying to move through my history, now, but I can see how this goes.
I do think I'd have to make a couple-few suggestions/requests to switch over fully, but... hmmm.
-
@krmbm @Ninjakitten @Rucket The Beip Dev (Bennet) is reading this thread now and then. Just doesn't have an account to reply. He's open to adding a feature to move the tabs to top if folks find it that jarring.
And for Ninjakitten specifically, there's no way to turn off the "auto copy on highlight", but I'll be sure to pass the suggestion along (even if he did already read it).
-
I've got a... er, short list of little things to probably bother the dev about on how they'd be in my perfect world, but so far, I'm pretty pleased with it -- enough to try a fully switched-over test period. Which is saying something, since I was genuinely at 'welp I guess I stick with SimpleMU until I can't get it to run anymore and then cry a lot'.
Also said dev seems super responsive and reasonable (hi, if he's reading this >_>). I know this stuff is a lot of work and figuring out what can be done about all the various users' personal preferences and if it's worth the time/effort in a given case isn't always easy, so that's admirable.
...plus, not having to copy-paste everyone's https links anymore is already so nice. T_T
-
@skew said in How to BeipMU: The best MU Client for Windows:
Page Highlights
- Matcharoo:
^(From afar|Long distance to|\S.{1,20} pages|You paged .+? with).*$ - Options: Regular Expression
- Appearance tab: Change Foreground, then click Foreground...
I use this to send them to a spawn rather than to highlight, but I ran into a form of page that isn't included in this today, so here's my new Matcharoo:
^(From afar|Long distance to|\S.{1,20} pages|You paged .+? with|To \(.+\), .+ pages:).*$Want more?!!?!?
Join the Discord server. There's some really great folks here. https://discord.gg/3A5quTU
It is pretty good.
- Matcharoo:
-
@krmbm said in How to BeipMU: The best MU Client for Windows:
Yeah, I don't Discord enough to bother joining a server. So, if anyone does and wants to send feedback? Being able to move the tabs to the top would be awesome.
Someone's going to shank me for triple posting, but tabs on the top is now in the current beta release. It's very exactly the bottom taskbar moved to the top below the menus, and I think it should settle in fine with SimpleMU muscle memory.
@skew said in How to BeipMU: The best MU Client for Windows:
More about Input Windows...
And by prefix I mean you can do
/newinput 'chat'and it will make a new input window wherein everything you enter into that window is automatically prefixed withchat.I tested this out for OOC conversation in one world, and found one important thing to add to this: since it's possible someone might want a prefix that butts right up against the text sent, if you don't you have to include the space in your prefix. So for something like OOC, it should be not
/newinput 'OOC'but/newinput 'OOC '. Hopefully, that might save someone else some confusion. But it works a treat once you set it up.Also @Tat sorted out some IC-text-message formatting that almost threatens to drag me kicking and screaming into the 21st century, y'all. It's pretty slick.